Showing posts with label House Renovations. Show all posts

Wednesday, 28 April 2021

Renovation of front driveway!

 So - time for some more before and after pics! Such a long time since I have been able to do this - and it is a sign of a little normality!

So - some before pics...hard to find actually considering how many pictures we have of the house!


and now for some progress pics......


might just skip to the completed pics....


Sunday, 3 November 2019

work in the attic!

So...since my interview the thought of going back to work has meant I have been working hard in the house!!  I have started to decorate the attic bedrooms....I say bedrooms - I'm just on the first one atm.   Below is a pic of the room before we moved in!


I can't find any pics of after we moved in - but this is what it is looking like so far...


Changing the lights makes a huge difference!!

It has been hard work - first tons and tons of cables came out - telephone and internet stuff....then lots of holes to fill.  Then the carpet came up - then another carpet which was glued down - that wasn't easy to get up!! Then ply board was screwed down - and all the screws were filled with glue - so now it is just floor boards which I am going to try and get decent! That won't be easy as there are signs of woodworm, holes in some of the boards, big gaps between boards and some have been stained with some kind of waxy varnish paint stuff.  They are original Georgian - so are over 200 years old so I am going to try my best to bring them back to life!  I have until just next weekend to get the room livable, because all the kids are visiting and one of them needs to stay in there!! I am confident it will be done - other than the floor that I am doing last.

I have ordered a huge rug, with matching smaller one for in front of the fire, I have ordered red chairs too.  I am hoping this room has a little designer feel to it - as I've gone for colours a bit different and matching purple and red....we'll have to see how it ends up!!  When all 3 rooms are done - it will be a massive transformation - from the pic you can see at the top of the page! I'm excited - and hope that if I get the job they wont want me to start for ages!!

Friday, 30 November 2018

Business reception, to games room - then dining room!


So, when we bought the house, we bought it off a company called Southwest Learning.  They held conferences and seminars etc, and Barnados rented the offices in the top floor.   When it was up for sale it looked, and was very much a business, but it was so easy to see past all that and just imagine how awesome it could be! We knew we wanted it as soon as we pulled up into the driveway and then walking in and seeing a house full of offices, meeting rooms, stationery cupboards, disabled toilets and urinals, meeting rooms, fire extinguishers, office lighting.....didn't put us off one bit!! haha

At the end of our tour of the house, we ended up in what was a Reception Room, we sat down in with the estate agent and put an offer in on this house - a low...low offer.  An offer, we truly hoped would be accepted, it wasn't! But they came back with a counter offer we were very happy with!!

Anyway I digress....the pic below was the reception room............


Andy and the estate agent sat in the above 2 chairs....I sat across the room.  We were excited because not only had we known we wanted it when we drove up - we both knew each other were thinking the same thing - this could be so perfect!!

AGES AND A TON OF STRESS LATER....

When we moved in - this room looked awful.  The carpet was yuck - it had a bright patch where the reception desk had sat - showing how discoloured the carpet was in the rest of the room.  There were - as with every other room - hundreds of cables, run in trunking across the top and coming down into the room for phone lines and internet, and there were about 20 plug sockets on the surface of the walls (not sunk in).

Initially we used this as a games room - and it worked sooo well....


These pictures are from Xmas 2017, but we have had MANY good nights in that room!

HOWEVER.....a couple of months ago - I decided to move the games room into the living room - move the living room into the bottom of the kitchen (where the dining table was) and move the dining table into the games room!!

The new games room looks like this:


So....happy with the new games room, I went to work changing the old one into a dining room.  There were only a few weeks before Christmas, when family would descended and we would make use of the dining table!

The walls are pretty bad underneath the paper - and it is a definite candidate for a new plaster make-over.  However, this room comes low on the list of priorities (in terms of needs doing v financial cost), so - it got painted over the existing wallpaper, which is just lining paper-like, one wall got papered (its been years since I have done it, and they are very high ceilings - so I'm quite pleased I managed it so well on my own!), all the wood work got a new paint-job, and it got a new floor - ply board first, then laminate - which I swore I'd never buy - but it does seem much better quality now!

So - not as perfect as I'd like it................ One day I'll get to properly concentrate on this room, have more time and hopefully more money!

So it took about 3 weeks to do this room, I must have spent a large proportion of that time filling soooo many holes in the wall.........


Actually really like the new laminate (not as cheap as I thought) floor!


Christmas dinner!

So in the last 18 months, this room has been a Reception (business), Games room and now a dining room!

Tuesday, 21 August 2018

back porch tiling project!


I also finished the tiles!!!  It was a nightmare right from the beginning to the end!  When we first took up the carpet tiles and saw that it had been "repaired" with ugly big black tiles I had no idea how we would sort it out.  A year later I had done so many DIY projects I thought - I can do that!  So...I knocked out the big black tiles...then some of the broken original ones.  Then I found that they wouldn't come out easily - and I broke others trying to get them out!  Then I realised that new tiles with stick up too high - so I had to break up the concrete underneath - which dislodged and broke more tiles - the area I had to re-tile got bigger and bigger!!  Meanwhile, I struggled to buy replacements - found the right size in reproduction tiles - but the white was actually cream and nowhere near the right colour - also the while ones were slightly bigger than the black ones.  I had to start searching repeatedly looking for original ones being sold.  I went and looked at some - but they were grey!  Eventually somebody was selling them online and I sent a broken one of mine to check the colour - they said they didn't match.  I asked for a pic and thought - that will do!! BUT I ended up paying about £80 for 14 white tiles - he charged me £25 for a 'small order' and £25 for postage!  Anyway - they were mm's too big!  So I had to shave off two edges with the wet tile cutter!

So - I had to lay more concrete in the gap as bringing up the old concrete had gone down to dirt and too deep.  I hadn't done this before - and in hindsight I really should have used more!

When it came to laying the tiles - I had to use so much adhesive because it was too deep.  I should have stopped and used more concrete - but I didn't really realise until it was too late.  The tiles are so tightly packed together I had difficulty getting them in - and they kept sinking in - in the adhesive!  Basically it was so stressful - but I finished it - and just hoped they'd be okay when dry!

Here are the pics!!

This is a 'before'pic.  You can see the large black tiles put it, but other bits were damaged too.


So - I started taking the tiles out....


This is how big the hole ended up after I had dug up the concrete - and broke and dislodged other tiles!!


as you can see the concrete underneath was too high - and tiles kept getting broken!


Anyway - this is how it turned out!!


You can see - on the bottom half of this pic - the slightly different colour white and new looking black tiles!


So - just need to do some grouting now!!  All in all, a major stressful pain in the butt - but good enough to 'use' the floor!

Monday, 14 May 2018

Sunday


What lovely weather we are having! Great if you have naff-all to do - not so great if you want to run or work on the house!!

Yesterday - was a day we didn't have anything to do - but I thought I'd tidy up the back porch before we went into the garden!  This led to pulling up the carpet tiles to expose the victorian black and white tiles underneath.  We knew they were there but some are damaged so thought it would be better to leave them covered.  However, now we have more time I should be able to repair or replace some of them.

Here you can see the awful carpet tiles which were on top of the tiles..


Carpet tiles up - cleaning was rather difficult - needs properly scrubbing - and some of the tiles are crumbling...


Then we made an awesome discovery - the tiles continued into the house....


So - we made the decision to pull all the carpet up in this section of the house - including on the three stairs....so it went from looking like this:


To looking this this:


THEN - we decided to see what was underneath the carpet at the other end of the hall - and ended up doing this:


You can see in the pic above that there used to be a runner down the middle - also a floorboard was replaced with something modern and bright - and at the end near the stairs - there are just big ugly boards down - so we have some work ahead of us to get this looking good!!

So - our day doing naff-all in the sun - didn't really turn out that way!!  We did end up in the sun later on and had a bit of a bbq!!

Friday, 27 April 2018

Renovation - two offices to a bathroom!


So, I thought I'd return to writing a little bit about some of the work we have done on the house. The bathroom, was a big job and brought with it many problems!!

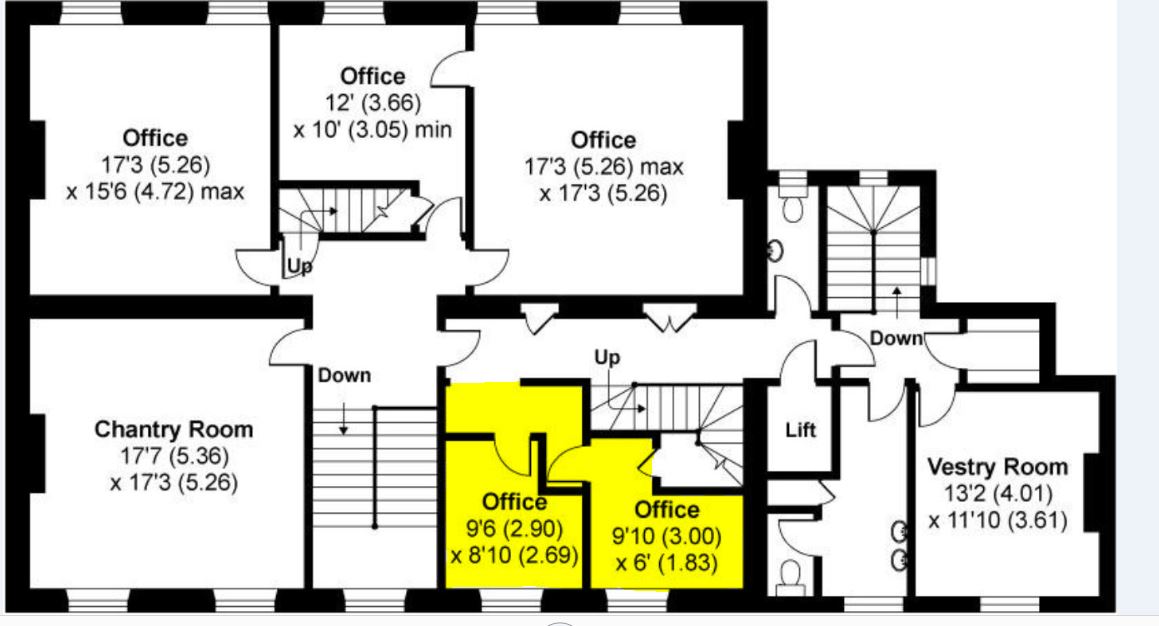
A room in this house had been made into two small offices, and as it was partition walls we thought it perfect for knocking back into one room and having it as a bathroom. It was a good location - upstairs in the middle of the house....here is the floor plan showing how it was before...


So, as you can see we needed to take out the walls in the middle of the room. Which also happened to have a radiator on each side - so first we had to get those off the walls!

Below are the two offices - and the doors between them that we also had to remove...


We removed these walls with a week of moving in! Adam and Paul came and helped, and it was a lot more difficult than we had anticipated! The wood holding up the walls, which the plasterboard was attached to - did not want to come out!! and the mess from the plasterboard was awful! The waste we had to get rid of too - seemed to triple in size as we took it out! Plus we couldn't put plasterboard in the tip - we needed special bags which we had to pay for - they were huge and I thought 2 would be enough. It wasn't!

You can see below how awful and dusty it was! This is my crazy husband Andy and my son Adam.


This was the first real look we got of it as one big room rather than two offices!


Tidied up it looked good!


I still had all the woodchip to get off the walls - and it needed plastering - it still had office lights and plug sockets...

So, the plumbers were already about - they saw it as two offices on the Friday when they went home and they came back to it looking like the pic above on the Monday!

I had designed how I wanted the bathroom - it looked something like this: (pic to go in)

So...the plumbers started lifting floorboards etc. and then they hit me with it - we can't do the bathroom in here! They said that there was a massive steel running right across the middle of the floor meaning that they could not run pipes across. Furthermore - because the house is extended further out on the floor below - all the waste pipes had to leave the room in the far corner and they would not be able to get the pipes at an angle so that the water/waste would run down it. Panic, disappointment, worry about the planning permission we'd need to change room...and what other room would it go in?? We scoped the house for other options - pulling up floor boards etc. Eventually they said - if we raised the floor, we could get over the steel thing, and get the angles they needed. So I searched for somebody who could do this for us - and £1,000 and a week later - we had a raised floor!

During this time I also stripped off a ton of woodchip wallpaper (the plasterer had provided me with a young lad - cheap labour to help, as at the time I was also stripping wallpaper off our bedroom wall), and I had all the walls plastered. When I tried to get the wallpaper off the ceiling - it started to come apart, so we had to put in a new ceiling and get that plastered too!! All of which was more expense we didn't expect. Before the bathroom could go in - I needed to tile too. I had done a tiling course whilst we were waiting to buy the house and I was very nervous about tiling it myself - my first attempt!!

I tiled an area where the sinks were going - and I really struggled because the wall was not flat - despite having been plastered.


Then I realised that there was no way I could tile around where the shower would be, because it was going up higher and the wall was so bendy!! I ended up getting the plasterer back to straighten the wall. They did not do a perfect job. I was stressing so much that Paul agreed to come and help me - and between us - I think we did a good job!!


Then...I had to paint, and get the flooring in - before we could finish getting the bathroom fitted. I think it was already October and we'd started this in June! I was desperate for this bathroom! I was so excited because I knew it would be awesome when finished!!

Here it is painted...you can also see the raised floor and the taps ready for the bath...


I cannot seem to find any pics of the floor going in - but I must have some - so will add them if I ever find them!! But it is Amtico, and is a pale grey wood type....thing...very nice!

The next thing that happened is that the whole bathroom went in - apart from the shower because we had so many problems with missing parts. Victoria Plum - have a lot to answer for - that and they sent me two sink pedestals that were all bendy and they looked nothing alike when stood together. The replacements they sent were all smashed - and eventually they checked everything and sent them specially packed etc. Took a LOT of time and stress to get this sorted and even more so with the shower!

So - the end result (I cant show the whole thing in one pic unfortunately - too many weird angles), and you get to see the new floor here too.....drum roll......


If you go back and compare these to the two offices, or the wall coming down, it makes you (me) realise just what we achieved. These pics don't actually do it justice. It definitely has the wow factor!